Sunday, November 1, 2015

Making House A Home...Finally

So, hiiiiii how are you guys doing???
In case you forgot who I am, my name is Sarah and I am a highly neglectful hobby blogger.

You guys, summer was rough on the inspiration front lines. 
Life got super busy and to be honest when it came to food, dinners were whatever was familiar and fast. On top of that I had an amazing vacation and I have to say, I was pretty resistant when it came to getting back to real life. 

Maybe it's the start of a new month or maybe the time change but something kicked into gear today and somehow the to-do list got completely crossed off. To celebrate, I figured I would get back to writing....quickly though because The Walking Dead starts soon!!

Even though we have lived in this apartment for three years, I haven't quite committed to decorating. My thought was that we are just renting so why bother when it's just temporary, but I CAN NOT take blank white walls any longer!!

You guys, decorating is hard and because it's in my genes....I have to make everything harder, so I embraced the DIY. I never understood those HGTV shows where a designer comes in and chooses every single little detail of the persons house. Everything in my home has to have a meaning.

So I started with our bedroom.

"Love you more" is our favorite little saying and the table on the right was my
great grandmothers!!


Feather Pictures - Target
Picture Frame - Walmart
Love You More Sign - T.J. Maxx
Wall Mount - Home Goods
Lamps - Home Goods

And this here was my little DIY project!


So it all started with a stick...
Kevin found this branch while camping and was using it as a make-shift fishing pole. When he brought it home I stared at it for about a year trying to think of something to use it for. While cleaning out my closet I found some ugly blue frames (a previous project gone wrong) and an idea was born!!

The frames were spray painted with a dark grey, eye hooks were screwed into the tops, and they were hung with hemp cord. It was going fine and dandy until it came to the matter of how I was exactly going to hang it on the wall. After multiple trips down every aisle of every hardware store I finally found hardware that would work. 
Curtain holdbacks that I just flipped upwards...who knew!!!


I really wanted our bedroom to be romantic and all about us and after I put new frames up, Kevin could feel what was coming next. It was time for new pictures of course!! 

So this is a sidetrack, but....here are some of my favorite shots.


Sorry about that but I just couldn't resist. 

So then it was time to tackle the living room...or is it the dining room...or maybe something in between. With apartment this size it's all the same anyways!!

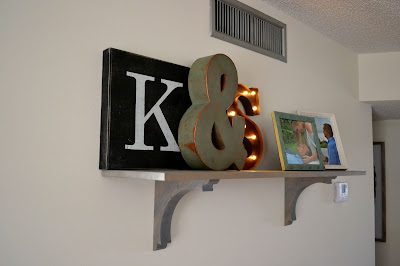
I super proud of this shelf you guys!!
It was a labor of love.


Kevin had the big piece of wood in his shop and again I searched long and hard for wood brackets that I liked and that could be stained. 
I used Minwax Classic Grey, three coats on the shelf and two coats on the brackets.

After staining them, the pieces sat in the living room for about a month, why you ask....because putting it on the wall was supposed to be Kevin's job. 
Listen I'm not one to usually wait around for help but this project required changing drill bits, lots of measuring, and wall anchors. All of these things scare me!!
Today I just couldn't wait any longer so I watched a YouTube video on how to change a drill bit (thank God for internet), and approached the wall cautiously with my tape measure in hand knowing that I couldn't mess up and put a million large holes all over the wall. 
And guess what...I did it!!

In even better news, Kevin felt major guilt for putting the project off for so long that he checked the last thing off his standing honey-do list...and now we have a fixed toilet.
Can I get a Hallelujah!!! 


Everything on display is from T.J. Maxx...are you starting to notice a pattern, that store is my Godsend. 

So there you go guys. 
I was a little hesitant on this being my first post back because I didn't think it would be very interesting but this blog is about my life, and well...this is what I've been up to lately.

I'm not done yet, I still have at least a couple of blank walls to fill and my kitchen is calling my name...so stay tuned for new recipes!

Sunday, July 12, 2015

No Mayo Deviled Eggs

Hey everyone!!

I have to say that I am so grateful to be writing about food today. Why, you ask??
Because I am finally able to eat it again!

I recently had to endure some painful dental surgery, which left me able to eat pretty much nothing. So unless you guys wanted me to write about how to warm up some soup in the microwave or open a bottle of nutritional shake...I literally had nothin' for ya! 

Fortunately, I am finally on the mend and I am starting to eat real foods again, Hallelujah!!
In order to avoid unnecessary pain, I have slowly been introducing foods that are still easy to eat.
Enter...the egg.

You guys, I have something to admit.
I HATE EGGS!!!
But, they are soft and are loaded with protein which I needed to heal so, blaaahhhhh.

Scrambles eggs.....gross.
Omelettes....gross.
Eggs Benedict smothered in Hollandaise sauce on top of Canadian bacon
...now we are getting somewhere.

For me eggs have to be either covered in something or mixed in with something to be palatable, but I was brave and decided to try my hand at deviled eggs. 
Even though I had actually helped make deviled eggs a bunch of times with my mom when I was younger, for parties and such, I had never actually tried one. 

Although a lot of people seemed to like my moms deviled eggs growing up, I wanted to try something different than the classic recipe, by omitting one of the main ingredients.
Exit....the mayo. 

I'm not a fan of mayo...the smell, the look, or the taste. (You want to know one of the main ingredients of mayo...it's eggs, go figure) Now, in my mind including mayo in my recipe just sounded like stuffing eggs with more eggs, and that's not something that sounded too great to me. Instead, I opted to use ingredients that I typically like!!

So here it is, ladies and gentlemen....the no mayo deviled egg.
And I liked it!!!

*This recipe makes enough for a party or event, but I quartered it in these pictures so that it was just a little snack for Kevin and I. 

Ingredients:
8 large eggs
3 Tablespoons Greek yogurt
1 Tablespoon Dijon mustard
1 Tablespoon sweet pickle relish
1/4 teaspoon salt
Paprika and dill for garnish

Put the eggs in a pot and fill with cold water until they are completely covered. 
Bring the water to a boil.

Once the water is boiling, turn off the heat, and put a lid on the pot. (Keep the pot on the burner)
Let sit for 12 minutes. 

Drain the water, and place the eggs in a bowl filled with ice water.
Leave in the ice water until they are completely cooled.
I think mine only took about 5 minutes...but I was only making two, so they probably cooled faster than if you had a whole bowl filled with them. 
Finally, peel your eggs. 

DO NOT SKIP THE ICE WATER!!
Putting them in ice water makes them so much easier to peel and keeps them looking pretty!


If nothing else, I was determined for my eggs to look pretty. 

Cut the eggs in half, and scoop the yolks into a bowl. 


Mash them up with a fork and then add the remaining ingredients. 

If your mixture looks too dry, add either more yogurt or more mustard. Taste test it first, to see which flavor it could use more of. 

Spoon your mixture back into the whites.
Garnish with paprika and dill. 


Sunday, June 14, 2015

I'm Still Here I Swear...2 Months Squished Into One Post

Ok, where to start....

You may or may not have noticed that I haven't written a new blog post in like....2 months, but believe me I have lots to share.

This post is probably going to be a little overboard, I have that feeling that you get when you see a really good friend for the first time after being apart for a long time....all the things you NEED to share with them just can't come out of your mouth fast enough!

Shall we start with food??

Mason Jar Salads And Snacks
Ok, so I have started a new system of jarring my food...stay with me.
I have a bad habit of not getting all of my daily fruits and veggies in. This is bad not only because they are just overall necessary for survival but they help keep your hair and skin beautimus (yup that's a word, I don't care if it's not in the dictionary). 
I found out that pre-portioning out healthy food, that is ready for me to just grab on the go, is really helping me. 
As if there weren't enough uses for mason jars...here's another one. Usually on the weekend I will make up salads and put them in large mouth mason jars and then use smaller jars to fill with chopped fruit and veggies. In the morning before work I just grab from the fridge and go!!
The jars are so amazing at keeping things fresh all week that I have no idea why everyone is not doing this!!


For the salads I just did a traditional one with all the things I like and then I did a pasta salad.
In these pictures I have the dressing already in the bottom of the jars because I thought it would just marinate the veggies but I found out that I don't actually like that......so I don't do that anymore!! I just add it in right before eating and shake it up to coat the lettuce. 
For the pasta salad jars I added whole wheat cooked pasta, spinach, and tomatoes then added balsamic dressing, but there are so many options for that as well!!


As for the dressing, I thought I would try making my own and it was so stinkin' good people!!
It tastes so much better than pre-made stuff.

Fresh Lemon Salad Dressing
Ingredients: 
1/3 cup fresh squeezed lemon juice
1/4 cup + 3 Tablespoons olive oil
1/4 cup white wine vinegar
3 Tablespoons honey
1/4 teaspoon sea salt
1/4 teaspoon black pepper 

Put all ingredients in a jar....and shake!


If your like me and decide to take these to work, your going to get a few looks and questions about why your eating out of jars but you won't care because your coworkers are missing out on a great idea!!

DIY For The Bride
My bestie is getting married y'all.....in just a little over two months, therefore it's time for the festivities to begin. 

Along with some pretty spectacular bridesmaids and one amazing planner, a beautiful bridal shower was formed!
Everything about this shower with the exception of the date, time, and location were a secret to the bride which is why I couldn't post about anything until now!!! Believe me, it was killer to keep what I have been up to a secret all this time. 

For my part in the shower, it was all about the DIY to make personalized things for the bride.
The only guidelines where a shabby chic/rustic theme and cream/white colors.....we're talkin' my language people!!
I was to be in charge of creating a bridal sash, veil, various dessert items, and a pasta salad, and I was determined to deliver.

With the help of the craft store, lots of burlap, my sewing machine, and copious amounts of fabric glue (a Godsend as far as I'm concerned) this is what I created.


So I wish that I had taken step by step pictures of the production of the sash and veil but to be honest this was the first time I had attempted this project and wasn't sure how it would turn out. It was kind of one of those things where I just went into work mode and hoped everything turned out like my vision. 

For the dessert table I decided to do two things; the bride and grooms favorite cookies in jars, and rice krispies on a stick. 

The jars where pretty easy, I just cut out some burlap and attached a chalkboard bubble to each, and as for the glass jars themselves....Walmart just has everything!
All that was left to do was make the cookies.


Rice krispies on a stick don't sound too glamorous, but they sure did turn out cute!!
Not only are the easy, but they are super cheap to make!
I just followed the traditional recipe that's on the side of the rice krispie box and then while still warm, formed them into balls and placed on parchment paper. 
I drizzled them with melted white chocolate and then sprinkled them with gold sprinkles. 


I put them in the fridge overnight to make sure they set and then inserted cakepop sticks (which you can find at the craft store) that I had tied a piece of twine around. 


For the pasta salad, I decided to try something I had never had before...and it did not fail!
The ingredient list looks long and daunting but you probably have a lot of the items already and if you don't, everything on the list is very inexpensive. 

Summer Veggie Pasta Salad
Ingredients: 
12 oz. bow tie pasta
1/4 cup vegetable oil
1/4 cup olive oil
1/3 cup red wine vinegar
1 Tablespoon dijon mustard
1 teaspoon dried oregano
1 teaspoon minced garlic
2 medium roma tomatoes
1 medium summer squash
1 medium zucchini
1 medium broccoli crown
1/2 medium red onion
2/3 of a 15 oz. jar roasted red bell peppers
1/2 bunch fresh parsely
Salt and pepper to taste 

Boil noodles until al-detente, drain, and pour into a large bowl.

In a smaller bowl combine the oils, vinegar, dijon mustard, oregano, garlic, and salt and pepper.
Whisk until combined. 

Chop veggies into bite sized pieces (or slices) and the onion and red bell peppers into thin slices. 
Add to the bowl with the cooked pasta and pour the dressing over top.
Stir until all combined and then refrigerate until your ready to eat.


The shower was so beautiful and I was so happy that I had the opportunity to make personalized items for the bride!


Mr. Owen Michael
My precious little nephew Owen Michael was born on May 19th at 7 lbs. 13 oz. and 21 inches long, and thus I became aunt Sarah!!

Last week I flew with my family to go see him....and the boy did not disappoint. Needless to say, the newest addition to the family has everyone wrapped around his tiny infant finger. 


Now I can't say I've been around many two week olds, and I may be a little biased but I'm convinced he is already far ahead of the curve. 
He is super strong and look, he is ready to beat this little toy fox up!!!


Like his auntie, he enjoys long afternoons of napping and a constant supply of food...he fits right into this family.


Next time I will see him will be in late August and I am so excited to see how much he will have changed!!

Random Tid-Bits
1. I'd say full on summer-mode has kicked in and all I want to do is be outside and keep it moving!! Most people think it's crazy, and maybe it's just the Florida girl in me, but being outside during the hottest part of the day is my favorite. I have the most energy at that point and I try and take that time to get in a work out and a little sun (which you wouldn't have guessed because my skin stays pale no matter what I do). Sweating it out in the heat makes me feel like I'm getting a better workout and getting rid of all the toxins in my body!!

2. I decided freshen up our guest room which meant getting rid of a bunch of crap and moving around furniture. Pictures will be posted once I finish decorating it, but it's finally functioning as an office and guest space instead of just a holding room for Kevin's hobbies. I'm actually writing in it right now!!
Oh, and this project reminded me how much of a pain in the ass painting is...there were plans to do the whole apartment, but those have been scrubbed for the time-being. 

3. It's still my ongoing mission to have crazy mermaid hair. Today I am trying out a new sea salt spray and I don't know if it really looks any different but somehow having sea salt in my hair makes me feel like I'm accomplishing my goal...don't judge me!!
There are big plans for it in the future so stay tuned. 


So I guess that's it for now. I feel like I'm probably leaving out a lot of other updates, but this post is probably long enough.

These next few months are going to be pretty hectic but I promise I will try and do more posts so that this doesn't happen again!

P.S. I'm not looking forward to going back and proof reading all of this :) 

Sunday, April 19, 2015

My Favorite Crock-Pot Lasagna

Lasagna is a comfort food loved by just about everyone, but no one ever makes it because it's too much work and takes too much time. 

Now, the long cooking time is one of the things that makes lasagna taste amazing so there isn't much I can do about that, but we can fix the labor issue.
Bring out that trusty crock-pot!

Since this recipe is so easy, lets skip straight to it....

Ingredients: 
1 lb. ground beef
36 oz. spaghetti sauce
8 oz. cottage cheese
8 oz. ricotta cheese
1 egg
1 Tablespoon Italian seasoning
1/4 cup grated parmesan cheese
8 oz. grated mozzarella
Regular uncooked lasagna noodles

Brown the ground beef in a pan over medium heat.


Once completely cooked, drain off any excess fat and return to pan along with the spaghetti sauce and set aside. 
In a small bowl, beat one egg and then add the cottage cheese, ricotta cheese, parmesan cheese, and italian seasoning. Stir until completely combined. 


Spray the inside of the crock pot with non-stick cooking spray.
Pour in 1/3 of the beef and sauce mixture .
Lay a layer of uncooked lasagna noodles on top of the sauce mixture. Break them apart so that they will cover the whole surface. 


Use half of the cheese mixture and spread it over the noodles. 
Sprinkle on a layer mozzarella cheese. 


Pour on another 1/3 of the sauce mixture and repeat the noodle and cheese layers, using the other half of the cheese mixture. 
Finish it off by pouring on the rest of the sauce mixture. 


Cover, and cook on low for 5-6 hours. 
That's it people, a little bit of prep and then let it cook slow and low to get that great lasagna flavor.

When it is done cooking, remove the ceramic pot from the heating element so that it can cool.


The reason we want it to cool before eating is so that it has time to set.
This will make it a little easier to remove in pieces. 
The longer you let it sit, the easier the pieces will come out.

Well....I had men to feed soooooo I didn't have much time to let it set, which explains why I don't have a picture of it on a plate.
All you need to know is....it tasted great!

Sunday, April 12, 2015

A Long Distance Baby Shower And All Things Blue

In a little over a month my baby nephew is due, and I will be an aunt for the first time!!

Unfortunately, my brother and sister-in-law live in a different state than most of their friends and family so having a baby shower in which everyone could physically attend would be pretty difficult.
Fortunately, my sister-in-law has some creative friends.
Enter....the virtual baby shower.

Now before yesterday, I had never heard of a virtual baby shower but when you combine excited friends and family members, a dedicated father-to-be, and a little bit of technology anything becomes possible. 
While the mommy-to-be was out to breakfast, my brother decorated their nursery and set out all of the gifts that we had sent over the past week. Using Google Hangouts, we were all able to video chat at the same time, and see the nursery all put together!

Since we couldn't all physically be with the future parents, I set up a bit of a "viewing party" at my house to celebrate with my mom and my sister.

I just wanted to share with you all some of the crafts, decorations, and recipes that went into my little celebration of the newest little family member! 

Of coarse everything must be blue.....even our outfits. 


For the table, I set out some flowers with blue hydrangeas and a fame with the word "boy" inside. 


To make the "boy" frame, I used a piece of burlap cut to the size of the glass and stencils to paint on the letters.

They have a woodland creature theme for their nursery which was also the theme of the baby shower, so I set out my little owls along with my blue plates, blue glasses, blue drink coasters, and a blue candle.


For a snack I made brie and apple crescents. 
They were so easy to make and everyone loved them!


Ingredients: 
1 tube of crescent dough for 8 crescents
Granny Smith apple
Brie 
Honey 

Preheat the oven to 375 degrees. 
On a baking sheet lined with parchment paper, lay out each triangle of dough.
Peel the apple, and cut into 1/2 inch slices.
Cut brie into pieces that are slightly smaller than your slices of apple. 
Onto the widest part of the triangle, place one piece of brie and then place one slice of apple on top.
Drizzle honey over the apple and then wrap the rest of the dough around.
Place in the oven for 10 minutes or until the crescents are browned. 

For the drink, I tried my hardest to think of something that would be blue, without having to add food coloring. What I got was not exactly blue....but it was close!! Haha. 


Ingredients:
Lemonade
Acai-Blueberry-Pomegranate Vitamin Water
Champagne

There is no science behind this one, I just added equal parts of each ingredient and stirred.   

There you have it, my little virtual baby shower viewing party!