Sunday, August 31, 2014

Brunch Time Lemon Rolls

Ok this is the last lemon recipe of the summer I swear!!!
I don't know what was with me this season, but I wanted lemon in anything and everything I could put it in. 

I'll admit this weeks recipe was sort of an experiment. 
I have read this recipe in a few other places and although it is easy, I had never used frozen dough before and they were so vague about what to do and how long things take, so I decided to become your guinea pig to try and get some more answers...your welcome. 

Like I said, these rolls are SOOO easy to make, but they are a waiting game. They are perfect if you are making them for a lunch/brunch occasion but if you try and make them for breakfast, you'll have to wake up before the sun comes up....and we just don't do that on Sunday's. 

Let's start with ingredients...

Ingredients: 
12 thawed dough balls (everyone raves about Rhodes brand, so thats what I got)
Zest of 2 lemons
1/2 cup of sugar (debatable)
1/4 cup of butter 

For the icing: 
1/2 cup of powdered sugar
2 Tablespoons of lemon juice
1 Tablespoon of butter 

You will also need a 9x13 baking pan, and plastic wrap. 


First things first, you have to thaw these suckers out before you even think about using them.
Put 12 in a large bowl, so that they aren't touching each other. 
Let them sit until thawed but still cold. 
This took about an hour in my kitchen (see, this sounds like a good thing to know!)


After they are thawed, you are going to cut them in half.
Nobody seemed to explain why we are cutting them in half......well my best guess is that they rise faster and also these rolls get pretty big when their whole, and we want dainty little cuties!!!!
So now we are going to end up with 24 rolls in the end. 


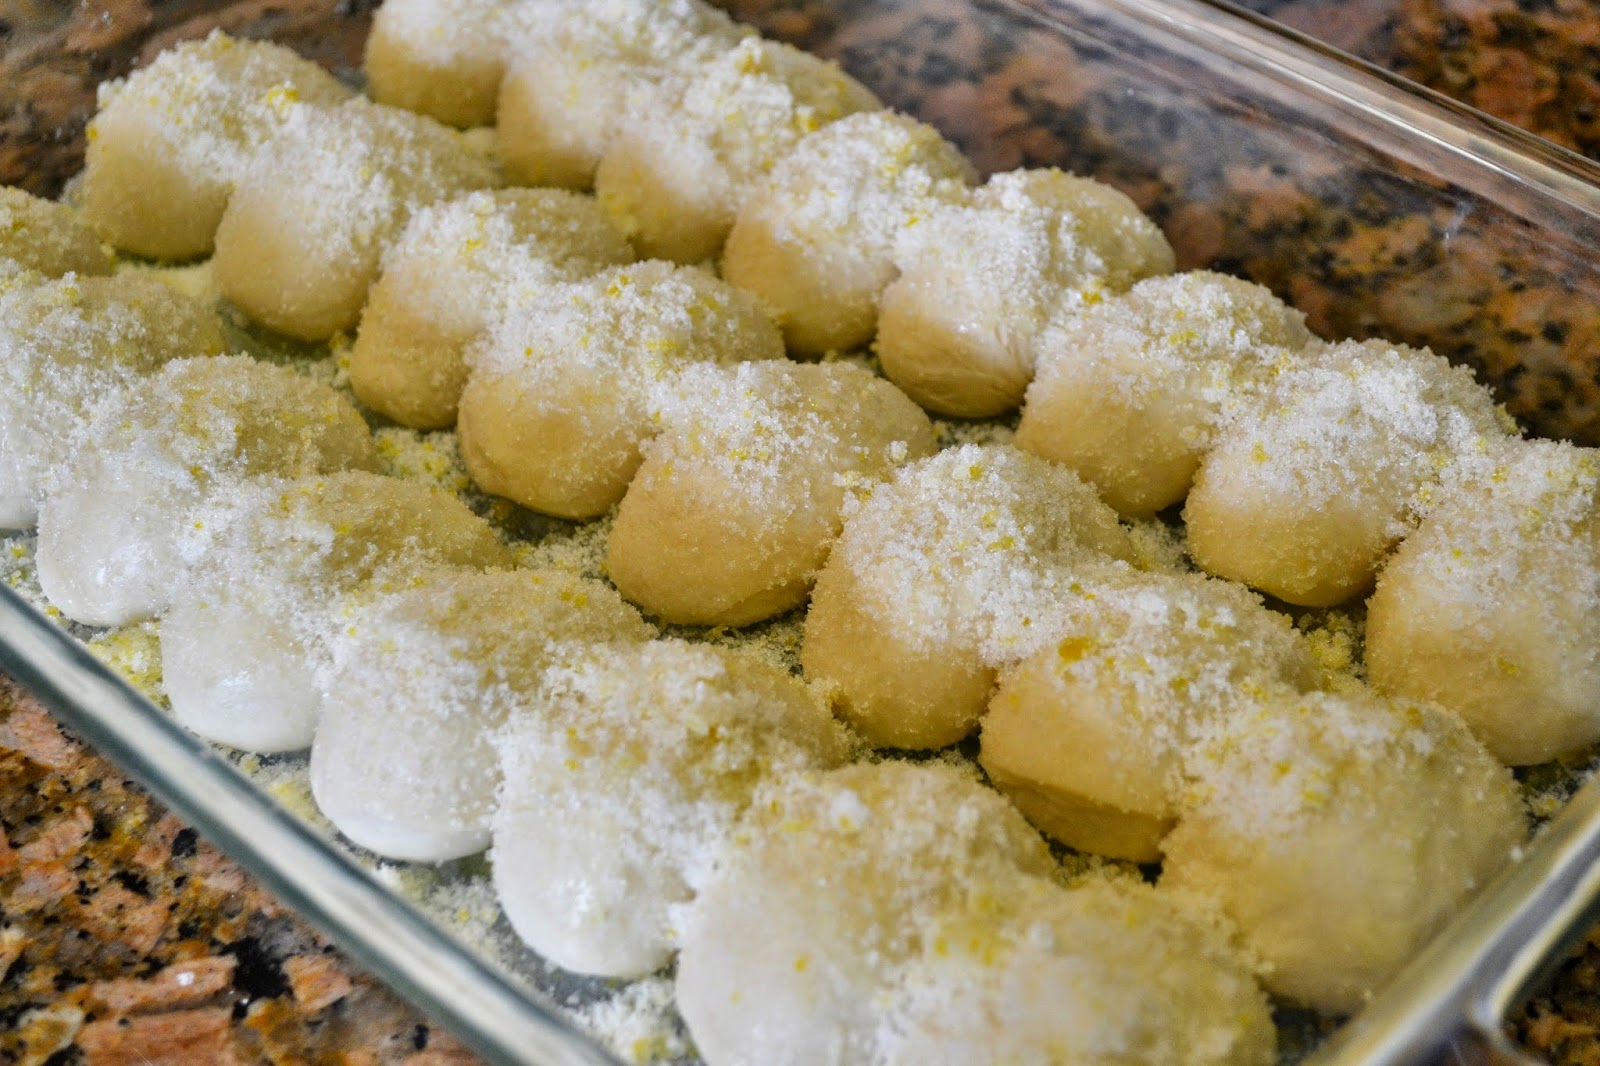
In a greased 9x13 baking pan, place each half of your dough equally spaced apart, flat side down. 


Zest two lemons to combine with the sugar.
Ok the reason I said 1/2 cup of sugar was debatable up in the ingredients list is because I think they would probably taste just as good with half the sugar. By the time you add the glaze, you won't be thinking "wow I really wish I would have doubled the sugar on top"...trust me.
So if your like me and like to go a little lighter on the sugar, only use 1/4 cup or 1/3 of a cup. If you tend to have a sweet tooth, go ahead and go for that 1/2 cup!!

Now comes the butter....yes butter ladies and gentleman, but just remember these are a treat!!
Melt 1/4 cup of butter and pour over all of the dough. 

Take half of your zest and sugar mixture and sprinkle over the top, reserving the other half for later. 


Spray a large piece of plastic wrap with cooking spray, and use it to cover the dough to start the rising process. 
Make sure you really tuck those babies in nice and tight, it will help the process. 


Now comes some more waiting...
Let the dough sit on the counter and wait for it to double in size. 
For me they took an hour and a half. 
I probably should have let them go two hours, but I just couldn't wait any longer!!!


Once they have doubled, preheat your oven to 350 degrees. 
Sprinkle the rest of your sugar and zest over them, and place into your heated oven and let bake for 20-25 minutes or until they are starting to brown on top. 

While your waiting for them to come out of the oven, make your glaze. 
Whisk together 1/2 cup of powdered sugar, 2 Tablespoons of fresh lemon juice, and 1 Tablespoon of melted butter. 
When the rolls are done baking, let them cool slightly and then pour on the glaze.

By the time they are done, you will probably be burning your fingers like me, trying to get them out of the pan to eat them immediately...... and it will be completely worth it. 

Sunday, August 24, 2014

Vanilla Cream French Toast Sticks

I'll admit that I'm not much of a breakfast person.

I eat a small bowl of cereal every morning, but for the most part I don't really like breakfast foods....particularly eggs (blahh). Honestly I could wake up in the morning and go straight to lunch, no problem, but because Kevin LOVES a big breakfast I thought I would make an exception this Sunday. 
He is a big fan of french toast but due to the fact that the bread is dipped in eggs I haven't really enjoyed it much in the past...until I found this recipe.

Most french toast recipes are just way to eggy for me, and I needed something with other flavors to counter that taste. 
Between the cream, the vanilla, and the cinnamon, this recipe is a hit even with me! 
If you are always on the go, or have kiddos, this is the perfect breakfast for you. Cutting them into sticks makes them easy to eat in the car, or for little hands that don't like to use forks quite yet. 

Ingredients: 
8 slices of white Texas Toast bread
5 eggs
1 cup of heavy whipping cream 
2 Tablespoons of milk
1 Tablespoon of sugar
2 teaspoons of cinnamon 
1 Tablespoon of vanilla extract 
3 Tablespoons of butter
Powdered sugar
Maple syrup 


Apparently no one in south Florida uses Texas Toast because I couldn't find it anywhere and it was driving me crazy (I couldn't even find any different brands that offered "thick slices"). Hopefully for you, your grocery store will carry it in stock. I settled for the thickest slices I could find but you could also ask the bakery to slice a loaf of their bread into thick slices for you. You want thick slices because normal slices easily break apart when dipped in the batter. 

Use a bread knife, or any other serrated knife to cut each slice into 4 strips. 


In a large bowl, crack 5 eggs.
Use a fork to whisk the eggs apart.
To the eggs, add the whipping cream, milk, vanilla, sugar, and cinnamon. 
Mix until completely blended.
It should look like this! 


Heat a large saucepan on medium heat and add one tablespoon of butter. 
Every stove is different, so if medium is cooking your sticks too quickly causing them to burn, turn it down slightly. 
While cooking, every time your butter runs dry in your pan, add another tablespoon. 

Once your first pat of butter is melted and pan is hot, quickly dip each strip in the mixture, let the excess drip off, and then add to the pan. 
I wouldn't recommend adding more than four strips to the pan at once, because it will get too crowded and hard to flip the sticks. 
Once the sticks are golden brown (or black if your like Kevin and like your toast burnt) on one side, gently flip them.
Once fully cooked add some powdered sugar and some syrup for dipping, and you have the perfect breakfast!


Wednesday, August 20, 2014

The Inconvenience Of Food Convenience

In the five years that I have been considered an adult I have come to the realization that I have lived a very very ignorant (yet blissful) life when it comes to the world of fast food choices.

I attribute part of this to my upbringing but also a large part to geographical inconvenience.
The closest thing to my house growing up was a McDonald's...and let's be real, who doesn't live close to at least one McDonald's.
Sure there were a couple of other fast food places in other parts of town, but none close enough to offer any reasonable convenience. 
Even when it came to grocery shopping our choices were Winn-Dixie or.....Winn-Dixie. I remember when we eventually got a Publix in town, and I thought it was so clean and fancy....I also remember my mother saying that it was too expensive, and that we were going back to Winn-Dixie.
You should have heard everyone when they found out we were getting a Walmart....it was a major achievement.

I know that I am not of the norm, considering by eighteen years old the list of fast food joints I had tasted food from was far shorter than the ones I hadn't. If it hadn't been for a certain someone (cough cough Kevin cough cough) encouraging me to try some of them, I might still be completely oblivious.  
(I almost named this post "How my boyfriend is making me fat" but I thought I might not push the blame onto someone else)

The truth is that I truly feel sorry for a lot of kids today.
The fact that they are bombarded with so many unhealthy yet convenient options is setting them up for unhealthy future.
A scary reality, despite what any studies may or may not say, is that fast food can be very addictive...it tastes good, so why couldn't someone become addicted to it?

I thought I was immune to this addictive feeling until last night while eating my one and only fast food vice. I don't want to name names but they make delicious burritos and are open late :)
Well the point is, that I drove to this particular location, went through the drive-thru only to get home to find that my "Cheesy Fiesta Potatoes" (ok that might give it away) were not in my bag.....and then I felt like crying.
I kid you not, I am one hundred percent sure that I acted like a two year old for a full ten minutes before coming to my senses. I was just so looking forward to eating those cheesy, crispy potatoes that it made me physically upset to not have them!!! To be honest, once I realized how stupid it was...it scared me a little.

If this sort of thing could happen to someone who hasn't grown up on fast food, and has only one fast food vice, imagine how an adult who has made it a part of their diet since a small child would feel if they no longer could make this a part of their regular eating regimen.

I am truly grateful that I was not exposed to so many of these unhealthy choices before I was an adult because by the time I was, it was at an old enough age to realize that I shouldn't be eating them all the time. But what about those kids who have it provided to them consistently because it may offer a desirable convenience for them and their parents. Those kids who grow up only to realize that they shouldn't be eating these things but can't help making the wrong choice over and over because it has become ingrained in their habits.

Now I'm not saying I'm an angel....and I'm sure I will still eat those tasty little potatoes occasionally but the next time they are left out of my bag I'll try to remember that it's really not that important...and that I'm probably better off without them.

P.S. Mom, thanks for always saying "you can wait until we get home and make a sandwich"  and packing snacks to go, instead of giving in to something maybe a little easier....I can see your motives now.
P.P.S. Since moving away, there are a couple of added fast food places to my old neighborhood....right across from that beloved Walmart.

Sunday, August 17, 2014

Super Quick 7 Up Biscuits

These last couple of weeks have been ones for the books.
If you haven't noticed, I haven't posted any "Life" blog posts, and last week there was no "Tasty Sunday" recipe.
Between being crazy busy at work and issues at my apartment, any amount of spare time I have had has been spent sleeping or trying to relax. 

Work is the busiest that it has ever been between a growing number of clients and half of our team still in training. Lets just say that I didn't cook dinner for a long time because by the time I actually got home, there was no way I had any energy left. 
Just when work was starting to simmer down.....catastrophe struck. 

Just as I was climbing into bed at 11 o'clock on Tuesday, I smelled a familiar terrifying smell that no one wants to smell in their house.....the smell of an electric fire. If you have never smelled this before, once you do it will be something that you will always recognize.

Once the lights flickered on and off and I heard a pop, I knew I was in for some trouble. Turns out that the drainage pipe for our AC system had become so clogged with algae and other gunk (gross I know) that it had backed up all the way to the coils and was pouring water straight down into the electrical panel of my hot water heater below it.

Well we all know how much electricity and water love each other. 
Long story short, I had a fried water heater and an AC I couldn't run without water pouring everywhere.
I think I got a total of three hours sleep that night...with no AC. :( 

Friday night my landlord came over to replace the water heater, and little old me assumed that it would be as simple as unplugging the old one and plugging in the new one....not so much. Fast forward almost four hours later and we have hot water. The set up isn't pretty but it seems to be operational for now, even though my AC still seems to be dripping some water. Like everything else in this apartment, it seems as though a cheap band-aid was placed on the problem and Kevin and I just pray it stays in place until it's time to leave. 

Enough with my sob story and on to this weeks recipe!!
I was in need of some good comfort food this week, and biscuits seemed to be the perfect fix. 
Like most people, I always used to think that making biscuits that didn't come in a can were way to much work, until I found this recipe!!!

7-Up biscuits are nothing new and are no secret but I never realized just how easy they could be. With only three ingredients, I felt like I had this recipe in the bag!

Turns out, they are just as easy as they sound!

Ingredients: 
2 cups of Bisquick 
1/2 cup of sour cream
1/2 cup of 7 Up 
1/4 cup of butter 


You will also need a 9x9 inch pan.
Another reason I have never made biscuits is because I thought I would need to buy all these special tools. When I came to thinking about it, I realized that a dough cutter can easily be replaced by a whisk (or fingers) and a round biscuit cutter can be replaced by a round drinking glass!!

Preheat your oven to 450 degrees.

Dump 2 cups of Bisquick into a large bowl. 
Add a 1/2 cup of sour cream and "cut" it in. 
"Cutting" the dough refers to incorporating something soft and thick into a dry flour mixture to make a crumbly texture. Usually this technique is used with butter, but in this case we use sour cream!!
Usually a dough cutter is used but I didn't feel like buying one, so I thought I would use a whisk...but that became annoying so I used my hands (the best utensil I have) until it looked like this..


Add 1/2 cup of 7 Up.
I again mixed everything with my hands until incorporated. 
It will be very goopy and sticky, but don't worry!!


Clear a large, CLEAN surface and sprinkle thoroughly with Bisquick. 
Plop your dough right in the middle. 


Generously sprinkle more Bisquick onto the dough. Gently fold in Bisquick just until the dough is no longer sticky, and then pat into a flat circle as big as you can make it while keeping the dough about 1/4 inch thick. 
When I looked up this recipe, they all said that there would be no need for a rolling pin and I didn't believe them!! I am used to working with pizza dough, that is constantly trying to shrink and change. This dough goes exactly where you want it to and it was amazing. 

Using either a biscuit cutter or a round glass, cut 9 biscuits. If you can't cut 9 out of your circle, just take the scraps and make into a new circle to cut the rest. 


Place your butter in your pan and put into the oven, just until it's melted. 
Use a spatula to easily get your biscuit off of your surface and into your pan. 


Bake in the oven for 12 minutes or until they are golden brown. 
Remove from the oven, and if your like Kevin eat them in about 2 seconds. 


Sunday, August 3, 2014

Barbie Drink With Layered Juice Cubes

When it comes to drinking alcohol, I'm a definite girl...I'm such a girl you could call me a "Barbie". 

My perfect drink combo involves anything that makes my brain go straight to lounging on a beach somewhere in the Caribbean and with my office no where in sight.  

Plus this drink is pink...and if you couldn't tell from the looks of my blog page, I like pink. 

Barbie Drink Ingredients
1oz. Malibu Coconut Rum 
1oz. Vodka
2oz. Cranberry Juice
1oz. Pineapple Juice
1oz. Orange Juice 


To make some snazzy ice cubes, that won't water down your drink after they melt, I made some layered cubes using the same juices that comprise the drink. 
Pour each juice into an ice cube tray, freezing until solid, between pouring each layer. 
You can layer the juices any way you want but I did orange juice layered between two layers of cranberry juice. 


Mix all of your ingredients, pop in a couple of your custom cubes and sip away.
I'm drinking one right now, and it's delicious!!